So far your humble correspondent was blogging about rather well-known areas of Report SharpShooter, talking you through the thorns of report slots, bubble charts and customization to the stars of reporting.
But this time it will be different.
We will touch a topic so obscure and controversial, so aggravating and vexed, so inescapably large and blatantly unexplored, that there’s literally nothing you can find about it on the internet.
We will discuss technical aspects of doing localization in Report SharpShooter. Feel free to grab the source code for this example at BitBucket, and follow me on the exciting journey of localizing a simple report!
How to use built-in localization.
Those lucky readers with dotNet ModelKit Suite installed can use the built-in localization. To see how it works, imagine you mouse hover the “Export report” button in a normal report, which brings up a tooltip:

Did you know that it’s possible to have the UI in a different language? Just bring up “Select Language” dialog, choose anything – say, Czech – from the list and enjoy the result:

Obviously, the latter is much more understandable for a Czech guy who doesn’t know English well ![]() .
.
But how to bring up that magic dialog, I hear you ask? Nothing is easier. Go to Start | Perpetuum Software | dotNet ModelKit Suite | Select Language, or simply type “Select Language” in Windows search:
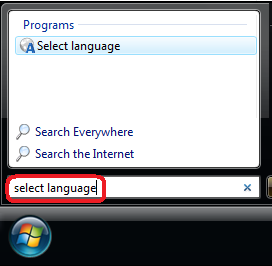
The above item will display a dialog with an impressive list of 19 languages: select the one you like, hit OK, and enjoy the fully translated Report Viewer.
This brings up a question, however. What would happen to localization if I open up my report on a machine that does not have SharpShooter installed? The answer is, alas, that built-in localization works only if you have the product installed. That’s the strength and weakness of being built-in, you know.
But fortunately, it’s pretty easy to implement custom localization which will reuse all the backend (you can even reuse the already mentioned “Select Language” dialog if you wish). We will go through all that in a great deal of detail in the rest of this post.
How to make a report localizable on a clean machine.
General idea of localization is pretty straightforward: instead of operating with real translated messages, you use keys and “changing the localization” effectively means telling the app to find the mappings for those keys in some concrete translation file.
Localization files of SharpShooter are normally located at C:\Program Files\Perpetuum Software\Net ModelKit Suite\Localization, and if we want to make translations available on a machine that doesn’t have SharpShooter installed, then in addition to the report itself we need to pass over the translations.
Here’s how we do that. Imagine we have a class which will attempt to read the translations from some custom folder. If the files are there, we use them – otherwise we perform a full lookup for the system translations (note that such lookup will fail on a machine without SharpShooter):
internal class LocalizationList
    {
        private readonly List _availableLocalizations = new List();

        internal LocalizationList(string folder)
        {
            var localizationFiles = GetLocalizationsFrom(folder);
            _availableLocalizations.AddRange(
                      localizationFiles.ConvertAll(x => new Localization(x)));
        }

        private List GetLocalizationsFrom(string customFolder)
        {
            if (!Directory.Exists(customFolder)) {
                Directory.CreateDirectory(customFolder);
            }

            var existingFiles =
                  new DirectoryInfo(customFolder).GetFiles("*.xml").ToList();
            if (existingFiles.Count > 0) {
                return existingFiles;
            }

            var copiedFiles = CopySystemFilesTo(customFolder);
            return copiedFiles;
        }
    }
Read the above as following: while creating the list, we provide the folder to look for translations. If there are any, we’d reuse them – otherwise we need to use the system translations. Below goes the implementation of system translations lookup:
private ListCopySystemFilesTo(string targetFolder) { var result = new List (); string systemLocalizationFolder = null; using (var key = Registry.CurrentUser.OpenSubKey( @"Software\Perpetuum Software\Settings\", false)) { if (key != null) { systemLocalizationFolder = key.GetValue("LocalizationFolder") as string; } } if (!string.IsNullOrEmpty(systemLocalizationFolder) && Directory.Exists(systemLocalizationFolder)) { var systemLocalizations = new DirectoryInfo(systemLocalizationFolder).GetFiles("*.xml"); foreach (var localization in systemLocalizations) { var customCopy = new FileInfo(Path.Combine(targetFolder, localization.Name)); if (!customCopy.Exists) { File.Copy(localization.FullName, customCopy.FullName); } result.Add(customCopy); } } return result; }
Another thing to mention is Localization class, which is basically a wrapper around SharpShooter’s Language type, and we use it for better displaying (in dropdown lists etc). You can find its implementation here.
And we’re almost done: just need to plug our LocalizationList into a real WinForms app. So let’s create one, drag-n-drop ReportManager onto the form and doubleclick on it to set up a report slot:
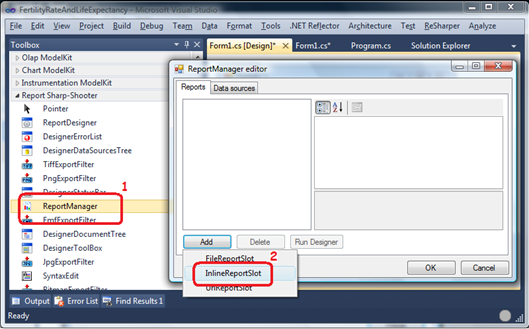
This time we want to be quick, so we make it inline, doubleclick on it to bring up ReportDesigner and hit Ctrl+N to make a blank report. No need to do anything else: we’ll be able to see the translation by looking at the toolbar in the Report Viewer.
Then we drop a dropdown list (call it cmbLanguages) and a button (call it btnPreview) onto the form: the dropdown will contain the list of all localizations, and the button will display the report.
To implement the above, we put the following in code-behind of the form:
 private void MainForm_Load(object sender, EventArgs e)
    {
        var localizations = new LocalizationList("Files");
        cmbLanguages.Items.Clear();
        cmbLanguages.Items.AddRange(localizations.Items);
    }

    private void cmbLanguages_SelectedIndexChanged(object sender, EventArgs e)
    {
        var selectedItem = ((ComboBox)sender).SelectedItem as Localization;
        if (selectedItem != null) {
            Language.CurrentLanguage = selectedItem.Language;
        }
    }
Nothing fancy. Upon form load, we look into the Files folder to see if there are any localization files there. If yes then we’d reuse them, and if not then we’d copy them over. The former is how the system will work on a clean machine, and the latter is the “must have” first run which would happen on developer’s machine.
Now code for displaying a report:
public MainForm()
    {
        InitializeComponent();
        inlineReportSlot.RenderCompleted += ReportRenderCompleted;
    }

    private void ReportRenderCompleted(object sender, EventArgs e)
    {
        using (var preview = new PreviewForm((IReportSource)sender)) {
           preview.WindowState = FormWindowState.Maximized;
           preview.ShowDialog(this);
        }
    }

    private void btnPreview_Click(object sender, EventArgs e)
    {
        inlineReportSlot.Prepare();
    }
It might seem like a bit too much for just previewing a report, but this approach is necessary due to asynchronous nature of Report SharpShooter. By clicking on “Preview” button we only start the process of “preparing” the report, and once that is done then our ReportRenderCompleted handler gets called.
Well, and that’s it! You can run the application on your local machine which has everything installed, and after the first run it will create a folder with system files, right next to your .exe (by default, everything will be under your Debug folder). Then you can archive the Debug directory, send it over to a fresh machine and enjoy your localized report there.
Summary.
Using built-in localization for SharpShooter reports is pretty simple, you just need to bring up the “Select Language” dialog which is already hand-coded by forethoughtful SharpShooter developers. Of course, this will work only on machines which has the full product installed – but good news is that having localized reports on any machine is also possible.
To implement localized reports on a machine which doesn’t have SharpShooter, you need a bit of coding described above in this post (the amount of coding could have been reduced even further if a class like LocalizationList from above was a part of the product). The manual coding, however, is quite straightforward anyway.
What to do next? You can browse source code of the above example here at BitBucket, contribute any fixes and improvements, or just download a zip archive and play around. Don’t take my word for anything – try yourself!
Good luck ![]()