ReportViewer was designed to satisfy any imaginable need, from open-save-print to zoom-export-whatnot functionality. It was self-complete, self-explanatory and self-complacent. One might expect, people will never want to change anything there.
So what happened when real users got their hands on Report SharpShooter? You got it: they immediately began looking for ways to customize the viewer.
Go figure.
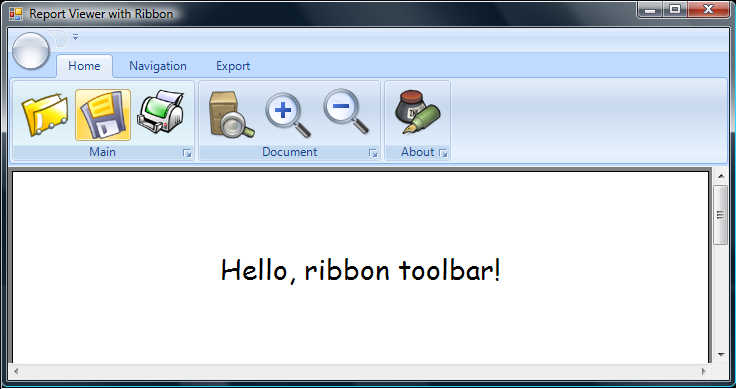
But as it turns out, it’s not too difficult to create custom UI which would reuse existing SharpShooter’s backend. In fact, we will do it right now: our task for today is to replace the toolbar in ReportViewer with a Microsoft Office-like ribbon. Sounds impressive, huh? By the end of this post, we’ll get something like this:

Good news that we don’t need to write our own ribbon control: there’s a great free implementation at ribbon.codeplex.com done by Jose Menendez Póo, which we’d reuse. Also, thanks iconarchive.com for nice icons!
Implementing custom toolbar.
As always, we start from creating a WinForms app, drag-n-droping ReportManager user control on it, and creating a new FileReportSlot within the manager (doubleclick on your reportManager1 to get the dialog).
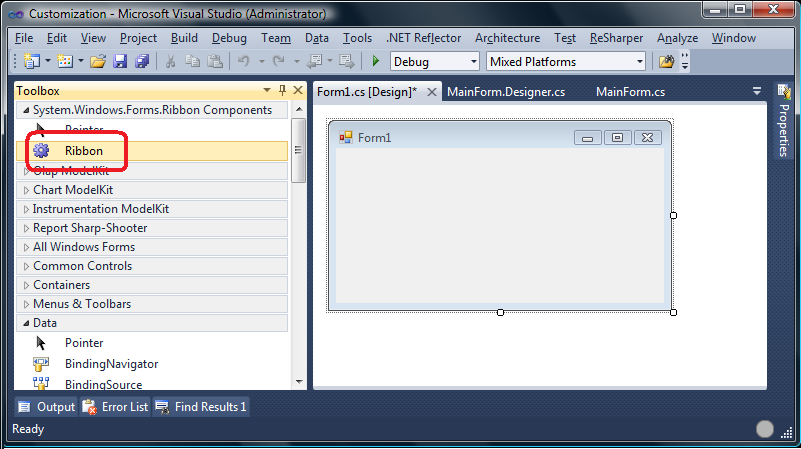
Then we add ribbon project from codeplex into our solution. Ribbon control is indeed designer-ready, so once the project is added we can drag-n-drop the ribbon onto our form, and start creating tabs, panels and buttons in Visual Studio designer:

I could tell a lot more about creating a nice shiny UI with this Awesome Ribbon Control, but I know you wish I wouldn’t ![]() . Instead, I believe you want to have a look at how to bind your nice shiny UI to SharpShooter’s backend.
. Instead, I believe you want to have a look at how to bind your nice shiny UI to SharpShooter’s backend.
Let’s start from top, here’s the final code:
public partial class MainForm : Form
    {
        public MainForm()
        {
            InitializeComponent();
        }

        private void MainForm_Load(object sender, System.EventArgs e)
        {
            reportViewer.Bind(Action.Print, printButton)
                        .Bind(Action.Load, openButton)
                        .Bind(Action.Save, saveButton)
                        .Bind(Action.About, aboutButton)
                        .Bind(Action.Find, findButton)
                        .Bind(Action.ZoomIn, zoomInButton)
                        .Bind(Action.ZoomOut, zoomOutButton);
            reportViewer.RefreshReport();
        }
    }
Well, this needs some explanation. First off, there’s no Bind method in ReportViewer, it’s our extension:
internal static ReportViewer Bind(this ReportViewer viewer,
                                       Action action, RibbonButton button)
    {
        var viewerAction = viewer.Actions[action.ToString()];
        viewerAction.Bind(new CustomActionBind(button));

        return viewer;
    }
Few things to note about the method above:
- It’s an extension method on ReportViewer which also returns ReportViewer, and that allows us to do some neat call chaining as you saw in the very first snippet.
- SharpShooter code deals with a hashtable where you get actions by their string names. I find it error-prone and difficult to explore: it would have been much better if Visual Studio was suggesting me the available actions, not vise versa! To this end, we use Action, a small enumeration where values are named after the strings understood by SharpShooter.
- CustomActionBind is the recommended approach to implement action bindings. There’s nothing fancy in that type, although it’s not that easy to find out that you need it at all!
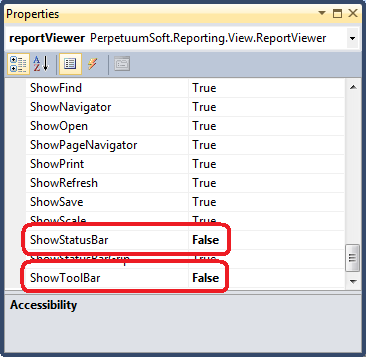
Once the above is done, the clicks on our ribbon buttons will invoke the mapped actions in SharpShooter’s viewer. The only final thing which is missing by now is to hide the original toolbar:

Source code for this project.
I’ve uploaded the project to BitBucket so if you feel like contributing to it – surely go ahead, pull source code from here! For now, it’s not that we have any concrete plans about moving on with BitBucket, so if you have any ideas don’t hesitate dropping a comment or two. If you don’t want to contribute but would like to play with the code – download the latest source code here.