How to add up to 20+ Custom Export Filters to Silverlight Viewer for Microsoft SQL Reporting Services 2008 in 3 Simple Steps using Aspose Rendering Extensions.
Introduction
The purpose of this article is to demonstrate how a developer can create a Silverlight application with the ability to display SQL Server Reporting Services reports and export them to 20+ different formats, providing additional features and experience to application users.
To help us solve the task, we use Silverlight Viewer for Reporting Services by Perpetuum Software, a software component allowing display SSRS reports in a Silverlight application and SSRS Rendering Extensions by Aspose, a set of rendering extensions allowing export SSRS reports to various formats, including DOC, DOCX, RTF, Excel 2003/2007, PPT, PPTX, FLV, SWF, etc.
Aspose.Total for SSRS includes 5 Rendering Extensions: Aspose.Words, Aspose.Slides, Aspose.Cells, Aspose.PDF, and Aspose.Flash. Depending on the application and user requirements, you can choose whether it is needed to add all or just some selected export options to your Silverlight application.
In this article we will show how to add custom export filters using Aspose.Words and Aspose.Cells for SSRS to Silverlight Viewer for Reporting Services 2008 in 3 simple steps: create a Silverlight application, add extra export options to an application with just a few lines of code to Web.Config file, and add images for custom export filters to be displayed on the toolbar of the application.
For your convenience, we’ve developed a working sample application, and the instructions below will help you understand how this application has been built.
Attachment: Use-of-custom-export-filters-in-Silverlight-app
Step 1. Prepare the Development Environment
Before creating an application, make sure that your development environment is configured adequately so your development process will go smooth and easy. To create a sample application following our instructions given below, the following software must be installed on your machine:
- .NET Framework 3.5 SP1/4.0;
- Silverlight v. 4;
- Visual Studio 2010;
- Microsoft SQL Server 2008 Reporting Services (Enterprise or Standard editions);
- Microsoft SQL Reporting Services 2008 Sample Reports;
- Aspose.Total for SSRS (the whole suite or any of 5 rendering extensions of the Aspose.Total for SSRS).To download and install Aspose Rendering Extensions, please follow this step-by-step guide.
Silverlight Viewer for Reporting Services 2008 v. 2.5.0.0 or higher
To download the latest version of Silverlight Viewer for Reporting Services, please go here…
As soon as everything is set up, we can proceed to the next step…
Step 2. Create sample Silverlight application.
First, we create a Silverlight application which will allow us to display SSRS reports. You can easily do it by following the Getting Started instructions.
Step 3. Adding custom export filters to Web.Config file.
Once a Silverlight sample application is ready, we need to add couple lines of code to the Web.Config file of your Web application to add the rendering extensions:
<PerpetuumSoftServices>

<!--

Set LogMode value="On" to log errors.

If hosting provider does not allow to write into files set LogMode value to "Off".

-->

<LogMode value="On"/>

<!--

The <PerpetuumSoftServices> section defines

configuration to access Microsoft SQL Reporting

Services 2008 web service.

-->

<Service Type="SampleApplication.Server.ReportService, SampleApplication.Server">

<!--

The <MsReportingServer> section defines URL to web service

and credentials to access Microsoft SQL Reporting Services 2008.

-->

<MsReportingServer Url="http://localhost/reportserver/ReportExecution2005.asmx">

<Credentials Domain="" UserName="" Password=""/>

</MsReportingServer>

<CustomExports>

<add name="AWDOCX" displayName="Aspose Word" imgPath="Images\AsposeWord.png"/>

<add name="ACXLSX" displayName="Aspose Excel" imgPath="Images\AsposeExcel.png"/>

</CustomExports>

</Service>

</PerpetuumSoftServices>
SSRS extensions are usually registered here:
C:\Program Files\Microsoft SQL Server\MSRS10_50\Reporting Services\ReportServer\rsreportserver.config
Here, we should find an extension which we want to add:
…

<Extensionbackground:yellow;mso-highlight: yellow">AWDOCX" />

…

<Extensionbackground:yellow;mso-highlight: yellow">ACXLSX" Type="Aspose.Cells.ReportingServices.Excel2007XlsxRenderer,Aspose.Cells.ReportingServices" />
The ‘’CustomExports’’ section name is the filters container which includes the following attribute elements:
name – a name of an extension as it is registered in the SQL Reporting Services;
displayName – displayed name of the filter which is shown in Silverlight Viewer for Reporting Services;
imgPath – a server path to an image of an export filter which is displayed.
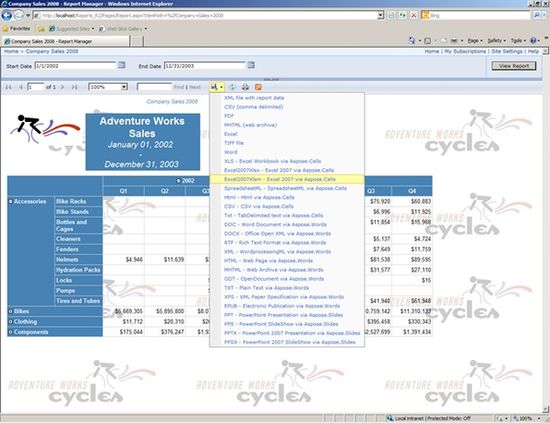
Before adding custom export filters, you can make sure that they work in Reporting Services correctly:
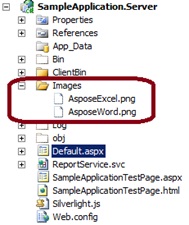
Step 4. Add images to display custom export filters on the toolbar of a Silverlight app.
If you would like to use images for displaying the additional export filters on the toolbar of your Silverlight application, you can easily make this happen by adding the corresponding images to server directory specified in your Web.Config file:
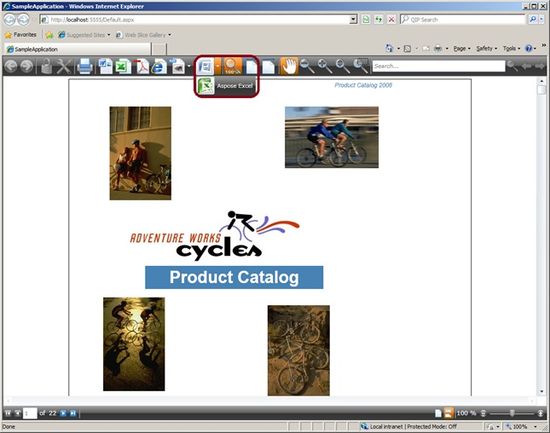
As a result, new export filers are successfully added to your application and your customers can easily export SSRS reports directly from the Silverlight application into additional formats by pressing the corresponding export option from the toolbar.
Conclusion
We have examined basic steps and got a simple application that solves our task. Using the same approach, you can add any other Rendering Extensions from Aspose to your Silverlight application. As you can see, it is easy and fast, does not require writing lots of code.
The tools Custom Export Filter is most usable for Silverlight Viewer and I interested in the review.