This time, I would like to describe how to create a widget displaying satellite’s location on some orbit. The stellite will move along 1 of 3 available trajectories; each of them is a sine. As a result, we will get the widget that will look as pictured below.

Let’s get to the gauge design.
Creating gauge in the designer
The first thing you need to do is to install Perfect Widgets if you haven’t already done it. To download Perfect Widgets go to this page: http://perfectwidgets.com/Order/Download.
Now we have everything to design the widget. Run designer from the Start menu.
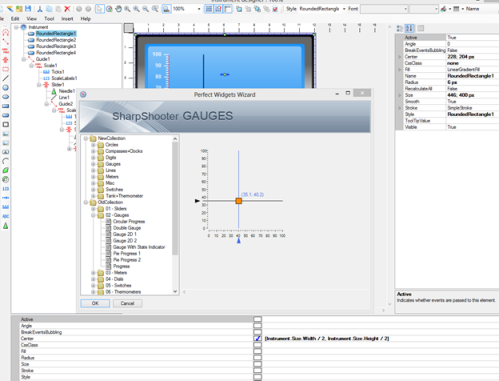
In order to make it easier to create the widget we will just modify an existing control and won’t create the widget from scratch. Select Gauge 2D 2 from the Perfect Widgets Wizard list.
Here I would advise you to expand the tree providing gauge structure (on the left of the designer) and look through the elements included in the control. The main elements responsible for base functionality are Guide, Scale, and Slider. They are consequently nested one into another.
A Gguide sets trajectory along which the element will move.
A Scale sets minimum and maximum values on guide.
A Slider allows positioning of the elements it contains according to the current slider value.
We are going to use map image over which the gauge will move. In order to add the map, select Picture control from the left toolbox and add it to the Guide1 level.
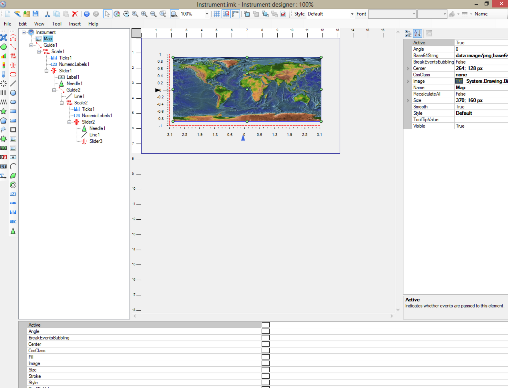
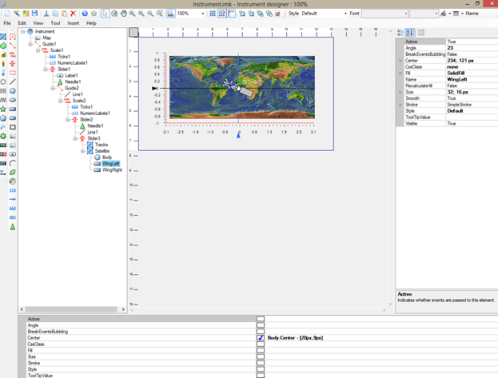
Map image is added to the widget. Now, let’s proceed to the satellite. It will consist of 3 components: body and two wings. Add the corresponding elements. Don’t forget about an important thing – to use bindings in order to make the satellite be located according to the sliders value.
Slider1 value positions element horizontally, Slider2 value – vertically. In order to set binding, it is necessary to click the Body element and add the following expression to the Center property in the lower area of the designer:
Slider’s GetPosition method gets coordinates on the widget area that correspond to the current Slider value. It takes value that defines shift relatively to the Guide element as an argument. In case of Slider1.GetPosition(0) we will get a point that will be positioned on the Guide as the argument is 0.
Bindings for the wing centers will be calculated relatively to the body position with a little shift.
Body.Center – [20px,9px] – for the left wing
Body.Center + [20px,9px] – for the right wing
As to the trajectory, we could add it on top of the map, but we will do it in the other way; we will set trajectory programmatically directly when the widget is initialized on the page. In this case we will be able to use the widget with different data without the need to re-design the control and we will also be able to add some effects to the satellite (for example, to highlight the current trajectory with a different color or something like that). Let’s add Group element to our gauge; this is a container that will contain trajectories.
That’s all – the widget is ready!
| View satellite gauge online! | Download satellite gauge now! | Download Perfect Widgets now! |